Making An Apple Basket


First we started with a wooden base on which 24 spokes of wide reed were attached. This would be the frame for the basket. Then we took a thin round reed and did a weave around the base for about three or four rows.


Next, we took a small flat reed and built up the sides of the basket using a start and stop method of weaving. This requires cutting and tucking each row rather than doing a continuous weave.

          After more than three hours of intensive labor on our baskets, we called it a night.

We left our baskets to finish another night.


Here are the finished products after another three hours of intensive work. We were very proud and thankful for the help of Junetta and Joann.


Christmas in July

The club had some crafting fun in July with several Christmas-themed projects. We made Stampin' Up greeting cards, string angels and painted wooden ornaments. One of our members, Kari, demonstrates for Stampin' Up, and she will conduct a demonstration on Tuesday, July 30 at 6 p.m.

Kari shows members how to assemble their cards.

Here is the finished product.

String Angel

Spoon Necklaces

Betty made this in memory of her son.

This one was hammered flat and charms added.

The ladies are hammering their spoon beds to flatten them.

The spoons are placed in a vice and the handle is hack sawed off.
At our June meeting, we made spoon necklaces. Everyone brought old spoons and charms to add to their creations. It was a very active project, and everyone enjoyed it very much. We also had fresh fruit and conversation.


Claymates

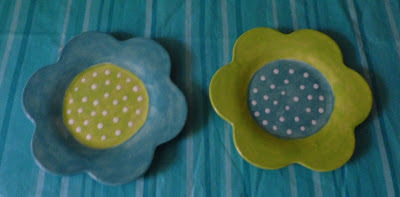
I made two little flower plates.

At our May meeting we went down to Dillsboro to Claymates. You choose your project, pick out your colors and glazes, then paint your piece. The pieces are fired later in the week, and you can pick up your finished projects pretty quickly. I made both of these for around $20. It was a lot of fun and something different to do.

Gourd Art


Here's a darker version of the gourd chicken.


Here's a highly embellished paisley design.

Barn red and moss green on gold paisley

In April, we decorated gourds with paisley designs and made chickens and gourds out of them. It is quite a process to get the gourds ready to decorate. The dried gourds must be cleaned and sanded smooth. These were painted with a double base coat. When the designs are finished and the pieces dry, they need to be sprayed with a clear coat to preserve them. It was a fun project, and there were many different interpretations of the fowl.

You start with a dried, cleaned gourd like these in their natural form.
Here are all the gourds in their base coats drying in the sun.
The golden gourds looked pretty just as they were here.

Rag Rugs

You can either crochet or braid the rugs.
At our March meeting, Becky showed us how to make old-fashioned rag rugs out of strips of cloth. If you can find the selvage end of cloth on rolls, you can crochet it in a circle to make a rug. Back when all the textile mills were still here in the US, you could easily acquire these rolls. Now it is difficult to find them, and if you do, they are expensive. Or you can rip fabric into strips and sew them together to crochet or braid. Use a Q crochet hook which is a rather large one. If you choose to braid, you then coil the braids into a circle and whip stitch together. It is a good way to use old clothing or fabric to make a useful and decorative household item.

A rag rug made by Liz Wilson out of polyester

Tulle Scrubbies


At our February meeting, Betty taught us how to crochet tulle scrubbies. We all caught on pretty easily, so it was a fun and productive night. We have changed our meeting night back to Tuesday to accommodate several new prospective members. Come join us in March to make rag rugs. If you want to crochet them, bring  a large hook, like a Q. If you want to sew them, bring needles and thread. You'll also need fabric to tear into strips. The meetings start at 6 p.m.

Coiled Baskets


A coiled basket using brown tones and darker contrasting thread

At our first meeting this year in January, we braved the cold to revisit coiled baskets. Many of us were out the first time the group made them. You take narrow strips of cloth and wrap it around cotton clothesline to cover it. Then you use a glue stick to attach it. You set the sewing machine on zig zag and begin sewing your coil together. When the base is the desired size, you begin holding it up to make the sides. You have to hold it up and sew at the same time. You continue wrapping and sewing until your basket is the size you want, and then you finish off. It is supposed to look primitive. The more strings the better.